
 Have you ever had Dry Aged Meat?? Hubby and I were aware that some high-end butchers dry-aged meat, but we had never seen it let alone eaten it.
What is Dry Aged Meat? According to Wikipedia
| “Dry-aged beef is beef that has been hung or placed on a rack to dry for several weeks. After the animal is slaughtered and cleaned, it is hung as a full or half carcass. Primal (large distinct sections) or sub primal cuts, such as strip loins, rib eyes, and sirloin, are placed in a refrigerator unit, also known as a “hot box”. This process involves considerable expense, as the beef must be stored near freezing temperatures. Subprimal cuts can be dry aged on racks either in specially climate-controlled coolers or within a moisture-permeable drybag. Moreover, only the higher grades of meat can be dry aged, as the process requires meat with a large, evenly distributed fat content. Because of this, dry-aged beef is seldom available outside of steak restaurants and upscale butcher shops or groceries. The key effect of dry aging is the concentration and saturation of the natural flavour, as well as the tenderization of the meat texture.” |
I noticed on Facebook recently that Cotton Tree Meats not far up the road from us had installed a dry aging cabinet. The reviews were that the meat was something that had to be tasted to be believed.
When my birthday rolled around in August, hubby asked me what I wanted for my birthday, and where would I like to go out for dinner. I suggested a “2 for 1” present and said why not buy a piece of dry aged beef?
A short trip later and we were the proud owners of the most beautiful looking piece of 28-day dry aged Black Angus Rib-eye on the bone.
We like to think we are pretty capable cooks, but we thought we had better find out how to do this lovely steak true justice. The answer turned out to be a cooking technique we had not tried before. “Reverse Searing”
Reverse Searing is a method that involves slow cooking the steak in a super low oven until the internal temperature reaches the desired doneness, then finishing in a screaming hot pan to give a lovely seared crust.
This method works best with a thick piece of steak so have your butcher cut a nice piece of Sirloin, Rib, Rump or T-bone into at least 50mm thick (this will feed 2-3 people).
This is the step by step method.
Step 1:
Pre-heat your oven to 135º C
Step 2:
Pat your piece of steak dry with paper towel. (the drier you can get the
steak the better the crust you will get)
Season well with salt and pepper. (there is no need to oil the meat)
Step 3:
Place the meat on a grill over a baking pan lined with foil or baking
paper to catch any drips.
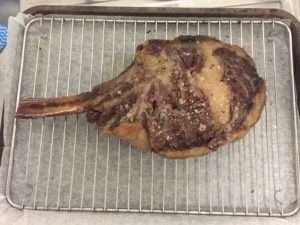
Step 4:
Bake in the oven until the internal temperature of the meat reaches your
required doneness. Do NOT guess this, invest in a meat thermometer.
Remove from the oven and rest under foil for at least 10 minutes.
Step 5:
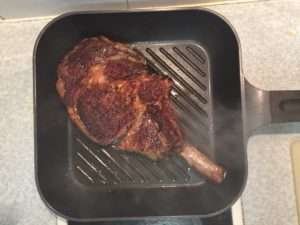
Get a heavy frying pan (cast iron is good) or BBQ screaming hot and add
a couple of tablespoons of vegetable oil to the pan. Carefully place the steak in the pan and sear well for 1- 2 minutes on each side, don’t forget the edges until a lovely golden crust forms.
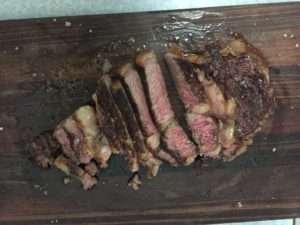
Step 6:
Place your steak on a board and cut it into pieces diagonally across the grain. Serve simply with a bit of herbed butter or your favourite sauce.

This was certainly NOT a budget meal, but still much less than if we had gone to a local pub and had a standard steak, salad and chips meal. And of course, it was sooooooo much nicer .
Next time you get a piece of steak, do try this method of cooking. It might
just change your life 🙂